Showing posts with label Cocktails and Crafts. Show all posts

Wednesday, November 30, 2011

Chain of Service

Yesterday we made a paper chain as part of our "holiday decorating with what we have." I want my kids to know that this time of year shouldn't just be about receiving cool gifts but is also about helping others, so written inside each chain is a small service they can help with.

It was a challenge to come up with 25 different services they could help with but we managed. Some of my favorites are:
  • Spend the morning at the local old folks home
  • Give the dog a bath
  • Write Great-Grandma a letter
  • Donate toys to children who need them more than we do
  • Bring food to the local food pantry
  • Help with dishes
Fingers-crossed that this is a small step in character building.

Sunday, November 27, 2011

Mid-Century Modern Paper Ornaments

This year I am determined to decorate my house for the holidays using what I have on hand. Luckily I have Pinterest on hand and inspiration is on overdrive most of the time. I love these mid-century modern ornaments and with a box full of card stock me and the kids got busy!

Here is the inspiration pin. You can find the original tutorial here from Design Sponge.


Cut and odd number of strips in gradually decreasing lengths, line up the ends and secure with staple or glue and repeat on other end, add string. The end.

I used a paper cutter and a hot glue gun. Mine are made with only 5 pieces of paper. If you want them to be really fat the inside piece should be significantly shorter than the outside layer.

To make the flower shape make a ball and then added a dab of glue to the center and flattened it.

Here are the ornaments hanging from my lights in the living room.

 And in the dining room.


Total cost: $0 (since I had everything) but if you were to go out and buy it would be about $1 to make two. I should have saved this for a cocktails and crafts since it was so easy!

Thursday, August 25, 2011

Button Monogram Tutorial - Cocktails and Crafts

Today we got back on track with Cocktails and Crafts. It has been forever because people were busy having babies! Now that all the new people are here we are ready to craft and drink.

The drink today was a classic mojito. Here is Food Network's recipe.

  • Ice
  • 6 ounces light rum
  • 12 mint sprigs, or spearmint, 8 roughly broken apart
  • 6 tablespoons fresh lime juice
  • 4 tablespoons sugar
  • Club soda
  • 4 slices lime
Place ice in beverage shaker then add in the rum, 8 broken up mint sprigs, lime juice and sugar. Shake well and serve over ice in a high ball glass. Top off each glass with a splash of club soda.
Garnish each with a slice of lime and a sprig of mint.

Today's craft was button monograms. We saw some great ones on Pinterest and knew we had to give it a shot. 
 
Step One: Create an outline of your letter. I used Photoshop and printed it on card stock. I think a block letter works best for this craft because it would be hard to get a lot of detail unless you had really small buttons and a really big letter.  The big splotch in the middle is mojito!
 
Step Two: Using a hot glue gun, add buttons to the inside of your letter, making sure not to go over your outline. Also helps to keep a cup of ice water to dip your burned fingers in.


Step Three: Repeat Step Two until you have a couple layers of buttons.

Look how beautiful it is on fabric!!

Sunday, July 10, 2011

Gocco Discovery

Sorry for the lack of posts. I am a doula and photographer and have been either waiting for a birth, attending a birth or editing some beautiful birth pictures. I would love to share the photos but that is a big ole no-no until mom and dad give me the go ahead.

But I am back, with a new obsession. I was cruising around Pintrest (my newest addiction) and found something called Gocco. Picture this little toy looking machine that allows you to make your own screen prints easily! I have wanted to get into screen printing but just haven't had the time to make or buy a screen. I want this.


If you want to see how easy the process is check out the web site www.SaveGocco.com.

The problem I am having is actually finding a machine for sale. A Google shopping search shows that they run anywhere from $150 to over $700. That makes me nervous. Definitely have to do some more research on how to buy one.


The process looks easy enough. Draw your image using a carbon pencil, burn it onto screen using the poison lighbulb and then add ink and press. If anyone has used one of these machines or knows a reputable place to buy one I would love to hear from you!

Thursday, June 23, 2011

Items May Appear Smaller At The Store

On my last trip to Joann Fabrics I saw on the clearance rack a flower I had previously passed up, because it wasn't worth the $4.95! It was on sale for a buck and some change we were in business!

I cut the flower off and hot glued it to an alligator clip. It turned out exactly how I envisioned it except about twice as large as I had hoped. Don't get me wrong, I am still going to wear this baby out, but it is a much bigger statement piece then I expected. More of a hat/facinator than a simple hair accessory.

I swear I can't accurately gauge the size/quantity of an object at the store. This can also be applied to clothing I am buying myself and food I put in my shopping cart!

Thursday, June 16, 2011

My Crafting Space

If you read or follow craft blogs you might have noticed the trend to post about your awesome craft room and show how neat and tidy you keep it all the time. If that is the kind of inspiration you are looking for, I suggest you stop reading the rest of this post. If you are looking for ways to store all your craft/yarn/fabric stuff without your house being taken over by storage totes then you should continue to read.

While I didn't have the guts foresight to take a before picture, you will just have to take my word that it wasn't pretty.

So without further ado... my craft space.

Now I know what you might be thinking - "Wow, that looks just like a dining room!" And I would say, "Correct!" I do all my sewing and general crafting at my dining room table.  See my sewing machine against the wall in its hard case? So glad I got the case.

So that brings us to the storage part. Like I mentioned before, imagine a small walk-in closet filled with storage totes (and some clothes). I could never find anything and if I did find what I was looking for, getting it out was hard physical labor.

Enter the storage piece...
Isn't she beautiful? I picked her up for $30 at my neighbor's garage sale and decided I was tired of all the white, brown and green that makes up my home's decor. This is Behr's Starless Night in semi-gloss. I love it, my husband is not sold on the blue.

The top two drawers are for knitting, crochet and sewing notions. The first two large drawers are for yarn (good yarn in one and not so great yarn in the other) and the next to drawers are for fabric scraps and uncut yards.

I still have some random supplies around, like patterns, random craft tools I picked up for Cocktails and Crafts and stuff I have no idea what to do with but feels like a waste to throw it away. Right now that is all under my bed.

I am learning more and more that in a small space organization in key to keeping your sanity. While I do love my new blue beauty I can still dream about my ideal craft room (and third bedroom, playroom and basement).
                                                                                     Source: thenestuk.blogspot.com via Sarah on Pinterest


                                                                                  Source: onelittleword.typepad.com via Sarah on Pinterest

                                                                                                        Source: None via Sarah on Pinterest

                                                                                                Source: google.com via Sarah on Pinterest

Wednesday, June 1, 2011

Project Intervention

Do you ever feel like you project list is just getting longer and nothing is ever crossed off? I was taking stock of all the projects I have either started or bought the materials for but haven't started and it is slightly embarrassing.

1. Cathedral window quilt
2. Knitting photo prop
3. Two Tunisian crochet patterns I need to commit to paper
4. Refashioned t-shirt dress
5. Anchor t-shirts for pirate themed birthday (wow, one I can actually cross off)
6. Zig zag quilt
7. Refinished dresser to house all my craft supplies (in progress)
8. Bird fascinator - oh yeah.

I feel like every time I start a project it inspires another project, especially those involving yarn. Maybe I need a craft intervention? 

Monday, April 25, 2011

Dollar Store Craft - Garden Marker

So the Dollar Store Craft Challenge wasn't the smashing success I was hoping for but my friends and I still had a great time creating our own! After stalking the dollar store's aisle for about a half hour I decided on my craft only to have a better idea the next day and had to drive back for the new supplies.

I decided to make garden markers to indicate where all the new plants my mom and I planted last week were located. 
All you need is:
  • Craft sticks - $1
  • Wood shapes (I used two packages) - $1 each
  • Hot glue gun and glue - Had on-hand but normally run about $3
  • Sharpie pen or paint - depending on how fancy you want to get - $1
  • Mod podge and paint brush - Had on-hand
  • Optional - Paint to color your markers (If I had more time I probably would have spray painted them before writing on them)

Step 1: Crack open your wooden sticks and shapes and attach them together with the hot glue.

Step 2: Using your Sharpie write the name of your plants on the wood shapes.

 That is my mom's nice handwriting, not my chicken scratches.

Step 3: Adorn with crayon or anything else you like. I had crayons handy so that is what I used.

Step 4: Coat each marker with mod podge and let dry.

Step 5: Place in dirt and take heart that you can now identify all your plants.
I don't know how well they will hold up, but for a the total purchase price of $4.00 I don't really care if they only last one year.

Saturday, April 9, 2011

Owls, Bowties and Mustaches, Oh My!

Have you noticed trends in the crafting world? First it was bicycles, then owls, followed up by mustaches and lately bow ties. Let's not forget over sized cowls, ruffles, flowers on everything and fingerless gloves. Everywhere I turn in the blogosphere and Etsy these motifs are unavoidable. Don't get me wrong, I love them (at least for a little while).


Sometimes they are even combined!

So then I started thinking what the next big trend will be. Here is what I have come up with:
1. Hour glasses
2. Keys
3. Skunks
4. Binoculars
5. Rabbits
6. Teapots
7. Thought bubbles
8. Chickens (fingers crossed that this one will really take off)
9. Granny Squares
10. Fringe

What do you think the next crafting trend will be? I would like to say I could offer a prize but all you get is bragging rights to saying you called if first.

Friday, April 1, 2011

Cocktails and Craft Challenge and Giveaway

Are you ready for some crafty challenge awesomeness? Join me for the Dollar Store Craft Challenge and have a chance to win an adorable crochet or knitting pattern from HandMadeAwards. Look at these cute rabbit pattern they offer - perfect for Easter!

 
Details:
Create something you love using items purchased at your local Dollar Store. Your total purchase should be under $10. You can use items you already have at your house (scrap fabric, yarn, scissors, sewing machine, drill, glue) but the main items for your project have to be purchased at the Dollar Store. 

Link up your project below and a panel of guest judges will pick a winner. Be sure to mention how much you spent and tutorials are encouraged. 

We will also have one winner picked at random from our followers. So if you don't feel like being crafty but want a chance to win one of the patterns, become a follower and/or join me on Facebook.  Leave a comment letting me know you would like to participate in the drawing. 

Looking for some inspiration? Check out the site Dollar Store Crafts. They have projects and tutorials that show how incredibly talented and resourceful people are. 

Winners will be selected on Friday, April 22nd. Go get your Dollar Store Craft on! 
 

Sunday, February 20, 2011

Cocktails and Crafts - Mozzarella and Moxibustion

Last Friday we made mozzarella! It was so easy I am not sure why anyone would buy it in a store after they learn the process. Animal Vegetable Miracle by Barbara Kingsolver is one of my favorite books. She offers a free 30-minute recipe here.

There are many different recipes out there for mozzarella and you can also make ricotta out of the leftover whey but we stuck to this simple recipe to keep the time manageable for a group.

Since most of the group is pregnant I was the only one drinking. I kept it simple with some good ole fashion Colorado Coors - conveniently already located in my fridge.

Okay - on to the mozzarella...

Heat up the milk to 55 degrees which takes about 30 seconds.

Add citric acid and watch it curdle. Science is awesome.

Add the rennet and once the curds have separated from the whey you strain out the curds.
Knead the curds to remove access water.

Pop it in the microwave for about a minute and start to stretch it. Holy crap - that looks like mozzarella!
 I forget (then and now while typing) that you add the salt before kneading the cheese. I also read that you can store it in a salt brine. We added some the whey back to a container for storage.

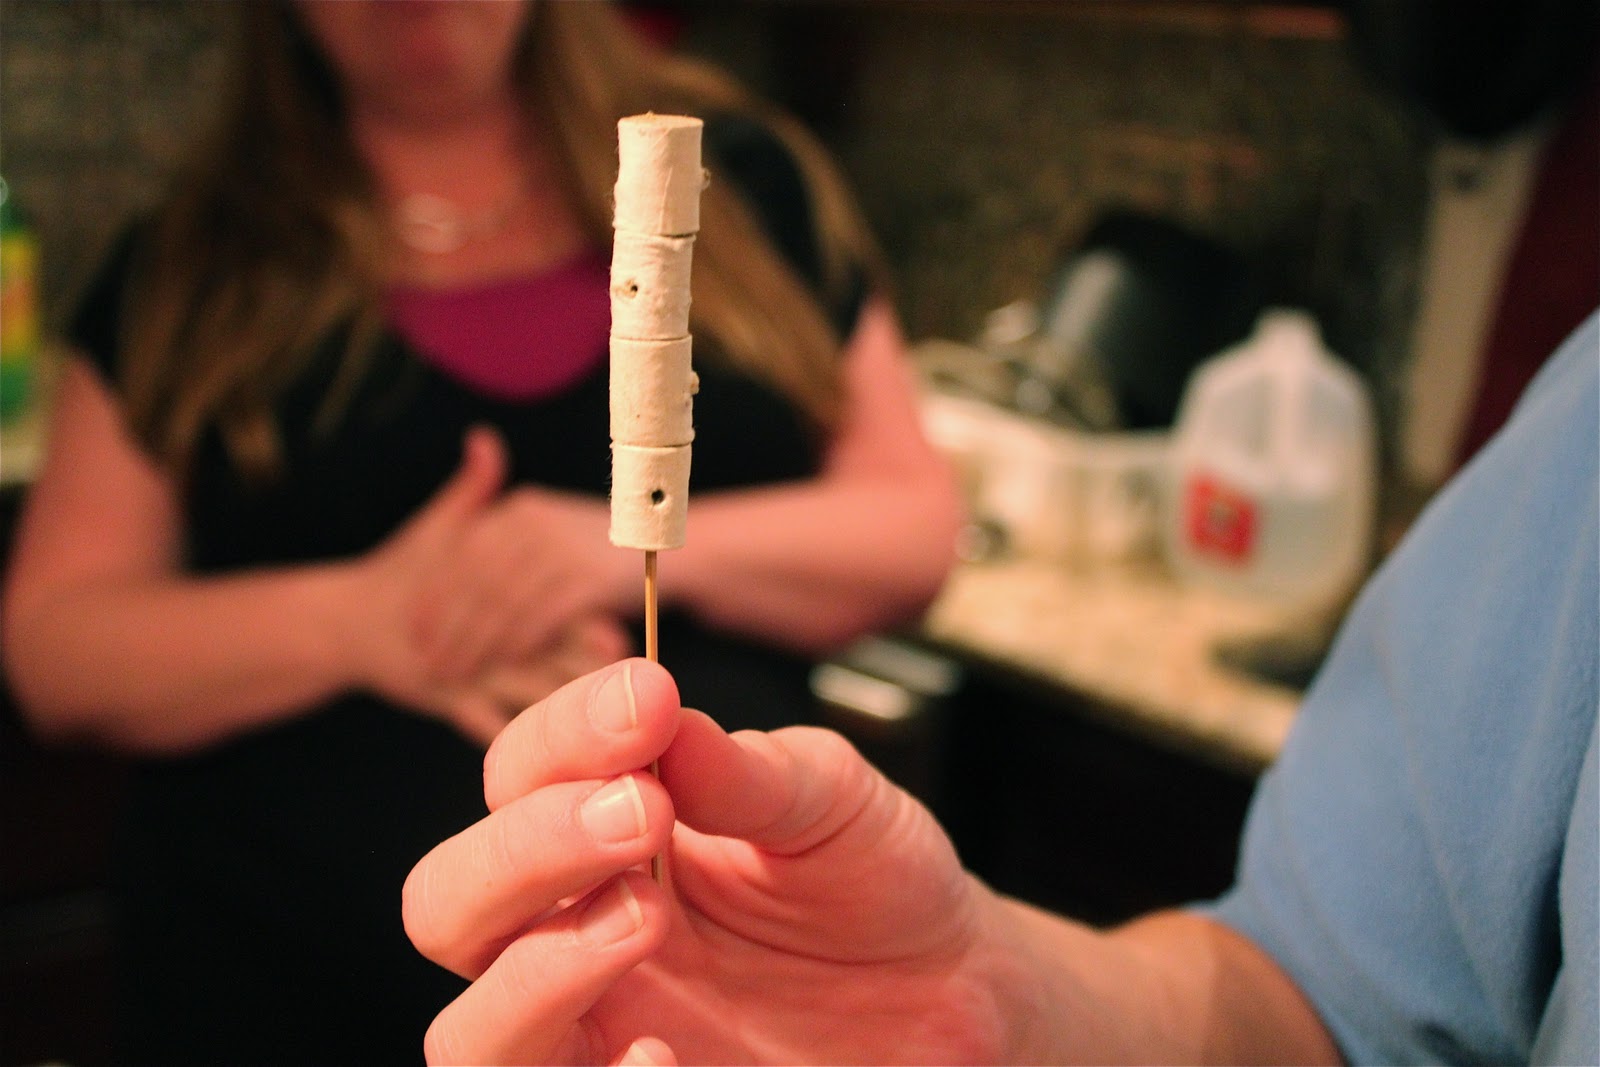
Not really related to cocktails and crafts - but we also had a moxibustion session to try and turn a breech baby.  You light the cones and then hold them to the outside of the pinky toe until it is warm and red. We did have a licensed acupuncturist administering the moxibustion.

The baby didn't turn at my house (damn). It does smell like an illegal substance (unless medically necessary) so I am sure anyone walking by my front door would rightly assume that this is the party house on the block - just not for the reason they are thinking.

Now go make some mozzarella. You can get all the supplies at Whole Foods, probably Wegmans, Trader Joes or Amazon.com.

Related Posts Plugin for WordPress, Blogger...