Tuesday, December 27, 2011

A Letter To My Son On His Fourth Birthday

Dear M,
Happy fourth birthday little man! Sorry your birthday is so close to Christmas, but it really wasn't my fault that you were ready to be born at 37 weeks. Did you know there was a big snow storm the morning you were born?


We are so lucky to have such a sweet and kind son. You take such good care of your sister and are always watching out for her. She is lucky to have such a great brother!

You love learning and can already read some books by yourself. You really want to go to school and since we didn't do preschool this year you have been busy working on school work from home. Your favorite thing to do is mazes and painting.

You have your own way of expressing your ideas that always make me smile. You have stories not dreams, you patiently wait for your pet crab to make his way back home and you are realistic about the lifespan of a pet chicken. You know Daddy can build anything and think the garage is his "house."

Here is a little more about you:
  • Your favorite color is green.
  • Your favorite food is spaghetti.
  • Your favorite book is any dinosaur book.
  • Your favorite show is Kipper the Dog.
  • You like orange trains, riding your bike and ice skating.
  • You drove your dirt bike for the first time by yourself on Thanksgiving.
  • Your favorite animal is the cheetah.
  • You often don't like doing something until we are done and then that is all you can talk about doing again - like camping.  
  • You have big feet and no behind.


Thank you for helping me become the person I am today. We can't imagine a world without you.
Love,
Mom

Wednesday, December 21, 2011

Raviolis

Today my Mother-in-law and I made raviolis for Christmas dinner. This is a 3 hour project that is best handled by a team. At the end of the process my daughter was up from her nap and my son was back from him bike ride with Grandpa and they were ready to help!

Child labor at its best!
Over 200 raviolis made, kitchen cleaned, floor mopped and take-out pizza for dinner on speed dial!

Friday, December 9, 2011

Blogging Question

I received an error message when I tried to upload my new header saying I was out of storage space. Has anyone else experienced this and what are my options?


Wednesday, November 30, 2011

Chain of Service

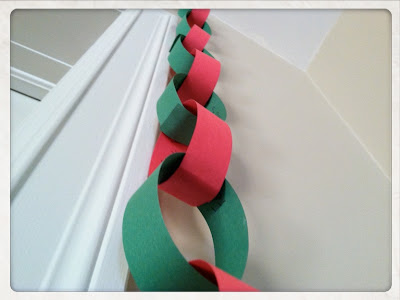
Yesterday we made a paper chain as part of our "holiday decorating with what we have." I want my kids to know that this time of year shouldn't just be about receiving cool gifts but is also about helping others, so written inside each chain is a small service they can help with.

It was a challenge to come up with 25 different services they could help with but we managed. Some of my favorites are:
  • Spend the morning at the local old folks home
  • Give the dog a bath
  • Write Great-Grandma a letter
  • Donate toys to children who need them more than we do
  • Bring food to the local food pantry
  • Help with dishes
Fingers-crossed that this is a small step in character building.

Sunday, November 27, 2011

Mid-Century Modern Paper Ornaments

This year I am determined to decorate my house for the holidays using what I have on hand. Luckily I have Pinterest on hand and inspiration is on overdrive most of the time. I love these mid-century modern ornaments and with a box full of card stock me and the kids got busy!

Here is the inspiration pin. You can find the original tutorial here from Design Sponge.


Cut and odd number of strips in gradually decreasing lengths, line up the ends and secure with staple or glue and repeat on other end, add string. The end.

I used a paper cutter and a hot glue gun. Mine are made with only 5 pieces of paper. If you want them to be really fat the inside piece should be significantly shorter than the outside layer.

To make the flower shape make a ball and then added a dab of glue to the center and flattened it.

Here are the ornaments hanging from my lights in the living room.

 And in the dining room.


Total cost: $0 (since I had everything) but if you were to go out and buy it would be about $1 to make two. I should have saved this for a cocktails and crafts since it was so easy!

Tuesday, November 22, 2011

Homemade Paper Christmas Ornaments


Let me start off by saying that cutting on a line isn't one of my strengths. In sewing it isn't so much a problem because of seam allowance, paper on the other hand isn't as forgiving. I decided to make these cute paper balls because I wanted to do more to decorate my house for the holidays but don't want to spend money we really don't need to. I looked around my house and found a bunch of a paper and decided to find some cute decorations I could make. 

I found this paper ball on Pinterest. It looked pretty easy and I had all the supplies already. You basically cut out 12 flowers, cut some slits and slide them together. It is a bit of a brain teaser but if you fiddle with it long enough it will come together. The original tutorial called for cutting it with a Silhouette cutter which I don't have. My flower shapes are more organic and less even.


I made the large orange one first and that turned out to be smart because it was easier to put together. I am going to make a couple more large ones and hang them from my living room ceiling lights. I might even go crazy and bust out the glitter.

After I "mastered" the large one I printed out some 4x6 photos on my home printer and combined them with some navy card stock. This one will go on our tree.

There is an even smaller template but I won't be trying that one any time soon. I need to work on my tracing and cutting skills to get that nice crisp image from the top of the post.  When I get them all made and hung from the lights I will post some more pictures.


How to Make Farmers Cheese

Holiday time at my husband's and my house means homemade pierogi. I grew up eating potato pierogi and he had cheese. Normally we would buy Friendship brand farmers cheese, which runs about $8.99 a pound, but this year we couldn't find it anywhere. Solution- make our own. We made mozzarella as a cocktails and crafts last winter and I remembered that the beginning of the process created farmers cheese.
To make your own you need four things:
  • One gallon of raw or pasteurized milk - not ultra pasteurized
  • Citric acid - I used powdered I had from making mozzarella but you could use a lemon or even vinegar
  • Something to strain the cheese. I started out with a cheese cloth but then switched to two strainers with small holes.
  • Heat

Sorry the pictures aren't that great, I was using my iPhone cause I was too lazy to get my good camera from across the room.

Put milk in a large pot. 
When the milk begins to boil (small bubbles will first appear at the edges), turn off the heat. Stir acid into the milk, and the milk will curdle. You may need to wait 5 or 10 minutes.
Line a sieve or colander with a cheesecloth, and pour the milk through the cloth to catch the curds. What is left in the cheesecloth is the Farmer's Cheese. The liquid is the whey.

  
Wrap in plastic, or place in an airtight container. Store in the refrigerator.
Different brands of milk will create different results. One store brand created worked perfectly with only one teaspoon of citric acid, the next needed three. Making your own cuts the price into less than half and gives you the satisfaction of saying you made cheese.

To get a printable version of this recipe click here.

Friday, November 18, 2011

Ice Skating

We went to the skating rink at the outdoor mall last weekend. My son had a blast, but my daughter isn't in to the cold weather sports like the rest of us.

Look mom, no help!


Okay, maybe a little help is good.


Monday, November 14, 2011

Oaklet Shawl

I said I would never knit or crochet a shawl but I couldn't help myself. I was getting tired or cowls and scarves and wanted to try something new. I had this great Malabrigo sock yarn in Playa and it wanted to be something just for me.
 

I am new to lace knitting and it is a challenge for me. There are so many distractions at my house that I have just come accept the little mistakes! My son helped me take the picture above and the one below, I love the perspective in the pictures he takes.

I don't think I will wear the shawl as an actual shawl but more as a scarf but I do want to show off how it looks.
Here is the link to my Ravelry project if you are interested in my making your own.

Saturday, November 5, 2011

My Crazy Kids


This was taken with my iPhone camera. I see either future Olympic divers or ER patients.

Monday, October 31, 2011

Evel Knievel Costume

My original costume idea for my daughter was this cute crochet lamb costume but the more I thought about it the more I realized that it just didn't fit her personality - enter EVEL KNIEVEL!! I think all parents of toddlers can relate on some level to the humor of this costume. She had no fear and is my little stunt woman.

I took a white sweater shirt and sewed on the blue striping and then added white stars with puff paint. After she colored in the stars with Sharpie marker (heart break) I went over them again with red puff paint. 

I made the pants following this tutorial from CraftStylish.  I sewed in the blue panel and then puff painted the stars on the side.
The cape was made with about a half yard of white satin and I sewed sequins in a V shape. I used a freezer paper stencil to write EVEL on the side in case there was any question of who she is.  She also has a helmet that I spray painted white and added sequins and Evel Knievel on the side. She refused to wear it and I was happy that I made a sequins headband last minute. You can kinda see the helmet in the picture below.


I am happy to report that Evel Knievel won 3rd place in the costume contest and Robot won 2nd even though he was screaming and crying by the time the contest rolled around!

Wednesday, October 26, 2011

Big Girl Bed

My daughter moved into her big girl bed after she figured out how to jump out of the crib this past weekend. She had been asking for one for a while so the transition was really easy.
I scored the damask comforter at Ross for $10 and the hot pink sheets were $7. I am not a huge fan of pink but she loves them and for $17 we can afford to change our mind and not feel guilty.

While we were setting up the bed and taking down the crib my son asked when he was going to get a new baby sister for the crib. We asked him if he was sure he wanted another sister and not a brother and he was sure! So sweet, but I don't foresee that in your near future buddy.

The only hard part is now she has access to everything in their room and she sleeps with lots of books in her bed. Here are some ideas I thought might help.

Under the Mattress Book Holder
Source: holycool.net via Nicola on Pinterest

Ikea Spice Racks

Fabric Book Shelves

Sunday, October 16, 2011

Cocktails and Crafts - Yarn Letters

Three words - Cake Batter Martinis!!

The craft this week was yarn letters which looked so easy on Pinterest but once again in practice turned out to be a lot harder to complete (I am sure the martinis didn't help us out at all).

I don't want it to sound like ours were awful, just not as crisp as we thought they would be.

Here was our inspiration for the cocktail.


This cocktail by far had the most alcohol in it, so the downside is that for a larger party it can  get kinda pricey. 

Cake Batter Martini:

makes a single serving, is easily multiplied
1 ounce amaretto
1 ounce Pinnacle whipped cream vodka (so good and I am not a fan of vodka)
1 ounce creme de cacao
1 ounce white chocolate liqueur
1 ounce whole milk or cream
assorted sprinkles (nonpareils work best)

I used some the milk to add the sprinkles on the rim.

I am sure cream would have been even better but we also had cheeseburger dip and cupcake fondue to indulge in. Isn't this a pretty drink?

This crafter went off the reservation and used mod podge to cover the letters in scrapbook paper. They turned out super cute!
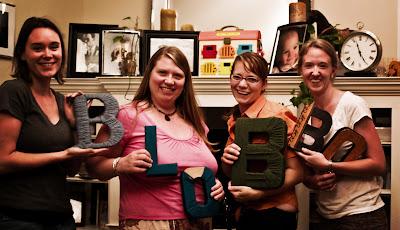
I used the larger cardboard letters from Joann Fabrics and some stash yarn. For a 12-inch letter I used about half a skein of Red Heart. You just start wrapping the letters in the same pattern you would write them in. You have to hold the yarn tight to keep a nice crisp look.

Here are our "finished" letters. Please note the time on the clock 11:25 p.m.! This was a long but really entertaining craft night.

Related Posts Plugin for WordPress, Blogger...