Tuesday, August 24, 2010

Clementine Birthday Doll

I really wanted to get G a Waldorf doll for her birthday but after finding out how much they cost I thought it was a better idea to make one. I purchased this pattern by LovelyWorld on Ravelry and thought it was so easy to make. I didn't want to make a knitted outfit too and after one failed attempt at a Simplicity doll dress pattern I decided to wing it.

Clementine - My first knitted doll
I bought a navy t-shirt at the thrift store because I know jersey doesn't fray and I could get away without finishing the edges. After two attempts I got a pattern that worked. After sewing the edges and the shoulders I realized that it was a bit too baggy. I attached a button the back shoulder and cut a small button hole on the other shoulder and voila - problem solved.

Close up of ruffle.
To make the ruffle I cut squares out of the small t-shirt and rounded the corners. By pinching the center and adding a couple stitches you end up with a small flower. I strung them all together with thread and then sewed them to the front of the dress. This totally made the dress! I love it.
I hope G loves Clementine as much as I do. Only one more month before her first birthday - can you believe it!

Sunday, August 22, 2010

Crocheted Cupcakes


I have been waiting all week to post this project but waited until I had actually given them to the birthday girl.

I wanted to make something special for my little friend's first birthday. First I tried my hand at a simple bunny rabbit but we decided it look more like a rat and opted for some fun food. I am so happy the bunny didn't work out because I love the pattern from BitterSweet. After spending waayyyy too much time on Ravelry looking for something fun to make I found her pattern and was drawn to the fact that she said they were quick to make. Quick is an understatement. I was able to whip one of these bad boys out during morning nap. Anyone who knows me knows that I have the a pretty short attention span so these were right up my alley.

I was able to use up some random yarn I had from other projects and easily altered the pattern to make the frosting fit the cake.

I scored the container at King Soopers when I went to the bakery and asked for a box that would hold six cupcakes. The young lad behind the counter looked confused and said, "I didn't know we had cupcakes in the case!"  Well - you don't, but thanks for the container. I did offer to pay but he had no idea how you would even ring up "empty cupcake container."

The label was made using a 2 x 4 mailing label that I whipped up on Photoshop. Not sure how long to container will last but it was perfect for the presentation of the gift.

Crocheted Cupcakes
Who wouldn't want their own bakery?

I have a feeling lots of birthday boys and girls will be getting these cuties. I hope Amelia loves them as much as I do.

Wednesday, August 18, 2010

Chicken Feed Prototype Bag

I got to thinking last time I bought Nutrena chicken feed that the bags they come in are very similar to the bags I bought at Wegmans for reusable shopping bags. So I got to cutting!

Keep in mind this was a first attempt and I wasn't sure how my sewing machine would handle the material.

First step - take off the top where the bags are sewn shut and then cut up one of the sides along a "seam."

I took the sides off to use at the handles. I was in a bit of a rush (nap time and all) and could have done a better job cutting it out.

I folded the handle pieces in half and straight stitched down the length of them.

Next I folded down the tops of the main bag pieces and straight stitched down them.

Then I sewed body together with right sides together. I wanted to make it a flat bottom so I folded the the bottoms to the side. (Clear and mud?) This part was harder for my machine, I could hear the struggling!!
By far the least thought-out part of this project were the handles! I should have attached them before sewing up the sides but I didn't, so live and learn. Again, my sewing machine wasn't thrilled to be sewing them up. You won't see any pictures of that part close up because to be honest - it is pretty messy.

For a project that was just done on the spur of the moment it isn't too bad. I know I will have plenty of feed bags in the future to practice on. It will easily hold a couple cereal boxes.

Here is Penelope checking it out!

Eggplant-Feta Phyllo Pies

My new issue of Everyday Food came in the mail this week. I love the simple ingredients, simple preparation and the mixture of vegetarian main dishes and meat dishes. Last night I tried out the Eggplant-Feta Phyllo Pies and serious could have finished off the whole pan myself.

Eggplant-Feta Phyllo Pie
  • 1 large eggplant
  • Extra virgin olive oil, for brushing
  • Salt and pepper
  • 2 oz feta cheese (I used 4 cause I love cheese)
  • 1/4 cup chopped pistachios - didn't include this cause the baby might have some
  • 1/4 teaspoon ground coriander
  • 1/4 teaspoon red-pepper flakes
  • 2 tablespoons fresh mint leaves, finely chopped (didn't include because all I have fresh right now is chocolate mint)
  • 5 sheets of frozen phyllo dough, thawed
  1. Preheat oven to 400 degrees. Cut eggplant in half, brush with oil and place on parchment paper, cut side down. Bake until tender.
  2. Turn heat down to 375 degrees. Scrape eggplant out of skin and chop. I ended up using my fingers and pulled it apart when I took it out of the skin and that worked great and enabled me to give some to the baby while cooking.
  3. Add feta, spices and 3 tablespoons of the pistachios. Season with salt and pepper. (I didn't because my feta was pretty salty already and thought the red-pepper flakes were enough of a punch.)
  4. Lightly oil muffin tins.
  5. Here is the tougher part - Lay 1 sheet of phyllo down and lightly brush with oil. Add four more sheets on top of the first. Cut into 6 squares. 
  6. Press phyllo into muffin pans, add about 1/4 cup eggplant mixture and then press the top of the phyllo down to cover mixture.
  7. Bake until golden brown, about 30 - 40 minutes. 
  8. Serve hot or at room temperature.
They were so delicious! I don't think they were filling enough to be a main dish unless you made a lot of them, but they did make a perfect side dish or appetizer.

Friday, August 13, 2010

Cocktails and Crafts - Tie Dye and Peach Tea

I'll admit I was a bit skeptical about the whole prospect of tie dye but it turned out to be a lot of fun!

Since the majority of the crafters are pregnant we went with a Peach Tea cocktail that was home brewed ice tea with slices of fresh Colorado peaches. It was very refreshing and sweet enough that Max enjoyed it but not sweet-tea sweet.

Our host Barb bought a couple tie dye kits and after half watching the instructional video we got started.

Step 1: Soak shirts in plain water

Step 2: Wring shirts out, and fold in preferred method - Roll, swirl, bunched - take your pick.

Step 3: Apply rubber bands to hold shape

Step 4: Place shirts in soda ash and soak
Step 5: Eat lunch
Step 6: Mix up dyes and clear a space to get your dye on
Step 7: Apply dye to shirt
Step 8: Wrap in grocery bag and let sit 12-24 hours.
These are the onesies that Jayna made. They came out great! I can't wait to see them on her new little munchkin in about seven months.

Wednesday, August 11, 2010

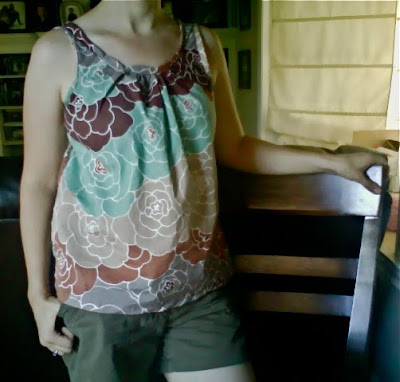
Simplicity Pattern # 2593

Today I ventured out in public wearing the first article of clothing I sewed for myself! I am happy to report that no one pointed and laughed and it held together in one piece the whole time I have had it on, two victories in my book.

Sorry for the less than stellar image - this was taken with my computer's camera.
I made it out of some Alexander Henry fabric, that for some reason I can't find the name of anywhere. I bought it at Mama Said Sew in Fort Collins if you are interested. I used Simplicity pattern # 2593 and think I could have gone down a size but still find it to be comfortable with a bit of room. Kevin isn't a big fan of it (please see previous sentence about it being a tad too large) but I think it is a perfect summer top.

Tuesday, August 10, 2010

We have eggs! 
I missed the first egg because I was in NY with the kids but now I am rewarded everyday with two fresh eggs. The eggs are still small but I hope as the chickens mature the eggs will get bigger. Kevin can't taste a difference but I can. They have a more vibrant color and I think they are creamer and just plain eggy-er.
Fresh egg in a nest fashioned by Max out of his blankies.
Little boy loves to pull the eggs out of the box but then doesn't want to let them go. The egg pictured above is in a nest he made for it. He almost makes me feel bad for frying them up by saying things like, "Ahhh Mom, look at the baby!" and "Do you hear a baby in the egg?" While I feel momentarily bad about taking the egg out of his makeshift nest, I feel much better after taking a bite out of a delicious fresh egg served over medium.
First fried egg, over medium - order up!
On a sadder, less tasty note - one of the Polish gals died. We aren't sure why but Kevin thinks it got stuck under the roost (a toddler bedframe) and couldn't figure out how to get out and panicked. I thought I would be more upset but think I was prepared after reading about all the ways a chicken can die. The sad part is now the other Polish gal (Elaine) walks around alone. Maybe next spring we can get her some more friends with silly hair dos.

Related Posts Plugin for WordPress, Blogger...